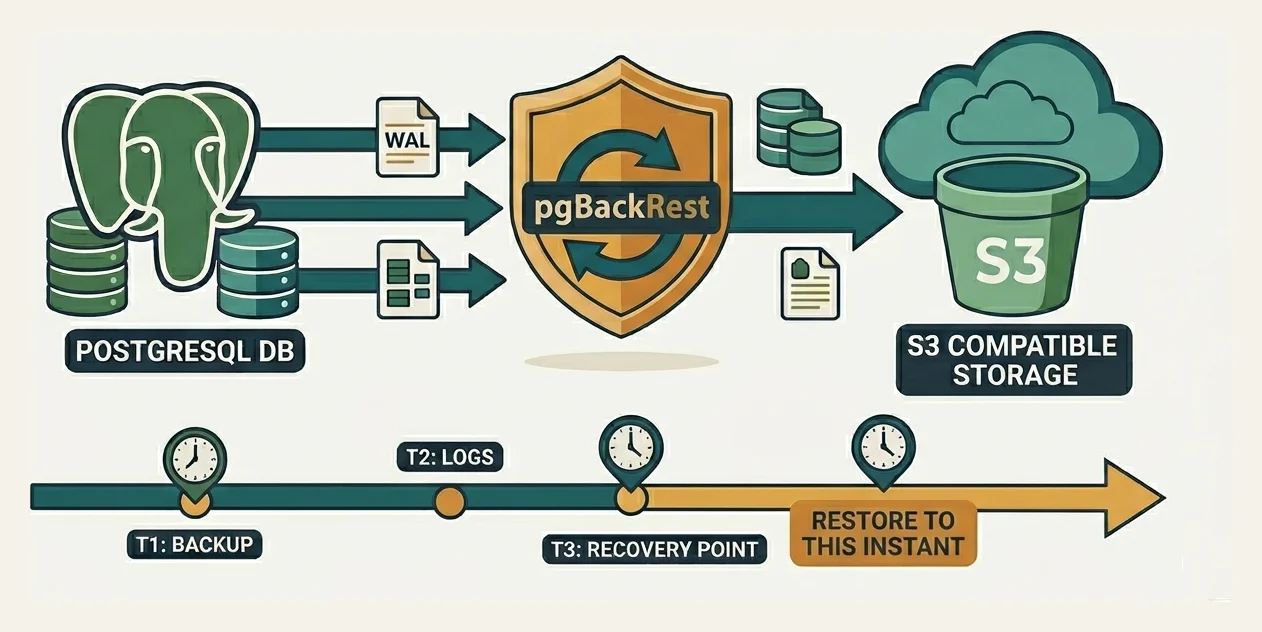
Postgres point-in-time recovery with pgBackRest and S3-compatible storage
A nightly pg_dump is reassuring until someone runs an unfiltered DELETE at 3pm and the only restore point is from 1am. Fourteen hours of data, gone.
Point-in-time recovery (PITR) fixes that. You restore to any instant covered by your backups, including the second before the bad transaction committed. pgBackRest is what makes this practical for Postgres.
For backups we’ll use S3-compatible object storage as the repository (pgBackRest’s term for the backup location, not to be confused with a Git or package repository; you’ll see the same word in its config keys repo1-*, CLI flag --repo, and official docs). pgBackRest speaks the S3 protocol, and that protocol is now a de facto standard: AWS S3, MinIO, Ceph RGW, Backblaze B2, Wasabi, Cloudflare R2. Swap providers and only the URL and credentials change. We use MinIO as the runnable example because it is open source and starts in one docker run.
Most of this post is the recovery itself. The setup is short.
Why do this when managed databases exist?
Fair question. RDS, Aurora, Cloud SQL, Azure Database for Postgres, Supabase, Neon, and friends all offer automated backups and PITR out of the box. If you’re on one of those and your needs fit inside their defaults, you may not need any of this. The reasons to roll your own anyway:
- Control over RPO and retention. RPO (Recovery Point Objective) is the maximum data loss you’re willing to accept in a disaster, measured in time: an RPO of five minutes means you accept losing at most five minutes of writes. Managed services pick the cadence and the retention cap for you. RDS, for example, retains automated backups for at most 35 days. Compliance regimes routinely want seven years. With pgBackRest you set the schedule, the retention, and the granularity, including where the line falls between full, differential, and incremental.
- Cost at scale. Managed backup storage is priced per-GB on the cloud provider’s terms and bundled into the instance bill. S3 (or B2, R2, MinIO on your own hardware) is dramatically cheaper, especially for long retention. For a multi-terabyte database held for years, the difference is meaningful.
- Flexibility and portability. A managed snapshot only restores back into the same managed service. A pgBackRest backup restores anywhere Postgres runs: a developer laptop, a CI runner, a different cloud, on-prem, or a different Postgres major version on the way up. That makes test refreshes, forensic copies, and disaster recovery to a different provider routine instead of fraught.
- Extension and version freedom. Cloud providers ship a curated subset of Postgres extensions, and getting a new one onto the list can take quarters or years (pgvector took a while; plenty of niche extensions never make it). Self-hosting means anything from PGXN, a vendor, or your own source tree: bleeding-edge versions, in-house C extensions, custom forks. Same with major versions: install the day it ships, not when the provider gets around to certifying it. Move fast, no lock-in, no waiting on someone else’s roadmap. The trade-off is that you also own the backups, which is where pgBackRest comes in.
- Sovereignty. Backups live in your bucket, encrypted with your key, in the region you choose, under your IAM. The blast radius of a vendor account compromise or a region-wide outage is something you control rather than inherit.
- Self-hosted is still very much a thing. Postgres on Kubernetes (CloudNativePG, Zalando), on EC2/VMs, on bare metal, in homelab clusters: none of these get managed PITR for free. pgBackRest is the standard answer.
Even on a managed service, this stack is useful as a second line of defence: take an independent set of backups out to your own bucket so a vendor incident doesn’t take your only copy with it.
Why pgBackRest
- Full, differential, incremental backups with parallel compression and transfer.
- Manages the Write-Ahead Log (WAL) archive that PITR depends on, and expires old backups and WAL automatically.
- Writes its repository straight to any S3-compatible endpoint.
- Per-file checksums and a non-destructive
verifycommand.
A backup alone gets you to the moment the backup finished. PITR needs the backup plus a continuous WAL stream after it. pgBackRest handles both.
How PITR works
Postgres writes every change to the WAL before flushing data pages. The WAL is an append-only log split into 16MB segments.
Two ingredients give you PITR:
- A base backup: a physical copy of the data directory at one point in time.
- The WAL stream archived continuously after that backup.
Recovery is: restore the base backup, then replay archived WAL forward. Replay everything for a normal disaster recovery; tell Postgres to stop at a target to land at an exact moment. Targets can be a timestamp, transaction ID, named restore point, or LSN.
The accidental DELETE: restore last night’s backup, replay WAL up to 2026-05-22 14:59:55, five seconds before the delete. The delete is in a WAL record that never gets replayed.
Timelines
Every completed recovery bumps the timeline ID. The original cluster runs on timeline 1; recover into the past and the new cluster forks onto timeline 2. The post-target WAL on timeline 1 stays in the archive, untouched. That makes recovery non-destructive: you can retry with a different target as many times as you need.
Setup
You need a Postgres server and an S3-compatible bucket. pgBackRest works with every supported Postgres release (currently 13 through 18 at the time of writing); the examples below use 16, so adjust paths and service names to match your version. For storage we run MinIO locally; a managed bucket on AWS S3, B2, or R2 slots in identically.
Platform notes
pgBackRest officially supports Linux and macOS. The commands below assume a Linux host with apt, systemd, and Postgres at /var/lib/postgresql/16/main, but the pgBackRest config, the archive_command, and the whole recovery flow are platform-agnostic.
- Linux: install via
apt-getoryumfrom the PostgreSQL apt/yum repos (newer than OS defaults). Service control withsystemctl. - macOS: install via Homebrew (
brew install pgbackrest). If your Postgres comes from Homebrew, the data directory is typically/opt/homebrew/var/postgresql@16(Apple Silicon) or/usr/local/var/postgresql@16(Intel), and you start/stop withbrew servicesinstead ofsystemctl. Adjustpg1-pathand the service commands accordingly. - Windows: pgBackRest does not run natively on Windows. Use WSL2 with a Linux distro (Ubuntu or Debian work well) and the Linux instructions apply unchanged. Your Postgres server can still live on Windows, but expose its data directory to WSL2 or run Postgres inside WSL2 as well.
MinIO and Docker work identically on all three.
1. Run MinIO
docker run -d --name minio \
  -p 9000:9000 -p 9001:9001 \
  -e MINIO_ROOT_USER=minioadmin \
  -e MINIO_ROOT_PASSWORD=minioadmin123 \
  -v minio-data:/data \
  quay.io/minio/minio server /data --console-address :9001
Port 9000 is the S3 API, 9001 the web console. In production, separate host, separate site, TLS in front.
2. Create the bucket and a scoped credential
Use the MinIO mc client. The root key is for setup only; pgBackRest gets its own user.
mc alias set local http://127.0.0.1:9000 minioadmin minioadmin123
mc mb local/pgbackrest
mc admin user add local pgbackrest 'a-long-random-secret'
Limit that user to one bucket:
cat > /tmp/pgbackrest-policy.json <<'EOF'
{
  "Version": "2012-10-17",
  "Statement": [{
    "Effect": "Allow",
    "Action": ["s3:*"],
    "Resource": [
      "arn:aws:s3:::pgbackrest",
      "arn:aws:s3:::pgbackrest/*"
    ]
  }]
}
EOF

mc admin policy create local pgbackrest-rw /tmp/pgbackrest-policy.json
mc admin policy attach local pgbackrest-rw --user pgbackrest
3. Install pgBackRest
On Debian/Ubuntu:
sudo apt-get install -y pgbackrestOn RHEL/Rocky/Fedora:
sudo dnf install -y pgbackrestThe PGDG apt and yum repositories (which you’ve probably already added to get a recent Postgres) also ship pgBackRest and track it closely, so prefer those over the distro defaults, which are often a release or two behind. pgBackRest itself is a separate project, not part of Postgres; PGDG just packages it alongside.
On macOS:
brew install pgbackrestOn Windows: run the Linux commands inside WSL2.
4. Configure pgBackRest
Put this in /etc/pgbackrest/pgbackrest.conf.
One piece of pgBackRest jargon to know before reading the file: a stanza is a named bundle of configuration tying one Postgres server to one or more repositories (the backup destinations, defined further down as repo1-*, repo2-* blocks). You pick the stanza name; almost every pgBackRest command takes a --stanza=<name> argument so it knows which database to act on. We’ll use orders as an example name in this post (pick whatever fits your database: orders, billing, primary, etc.), which is why you’ll see --stanza=orders on every command from here on.
[global]
repo1-type=s3
repo1-s3-endpoint=127.0.0.1:9000
repo1-s3-bucket=pgbackrest
repo1-s3-region=us-east-1
repo1-s3-key=pgbackrest
repo1-s3-key-secret=a-long-random-secret
repo1-path=/orders
repo1-s3-uri-style=path
repo1-storage-verify-tls=n

repo1-retention-full=2

repo1-bundle=y
repo1-block=y
compress-type=zst
compress-level=6
repo1-cipher-type=aes-256-cbc
repo1-cipher-pass=another-long-random-passphrase

process-max=4
log-level-console=info
log-level-file=detail
start-fast=y

[global:archive-push]
archive-async=y

[orders]
pg1-path=/var/lib/postgresql/16/main
pg1-port=5432
That file holds your S3 credentials (and the encryption passphrase, if you set one), so lock its permissions before doing anything else:
sudo chown postgres:postgres /etc/pgbackrest/pgbackrest.conf
sudo chmod 640 /etc/pgbackrest/pgbackrest.conf
NOTE
Ownership goes to postgres:postgres because pgBackRest runs as the postgres OS user (every command in this post is sudo -u postgres pgbackrest ..., and Postgres’s own archive_command invokes pgBackRest from the postgres-owned server process). 640 means the postgres user can read and write the file, the postgres group can read it, and nothing else on the host can touch it. root:postgres with 640 is a slightly stricter alternative if your team prefers root ownership; either is fine.
The repo1- and pg1- prefixes are pgBackRest convention, not names we chose. The number is a slot: pgBackRest supports up to four repositories (repo1 to repo4) and multiple Postgres hosts per stanza (pg1, pg2, …). Useful later when you want tiered storage, e.g. fast local disk on repo1 and S3 on repo2.
Notes on the non-obvious settings:
repo1-s3-regionis required by the S3 protocol; MinIO ignores the value.repo1-s3-uri-style=pathis mandatory for MinIO and Ceph (path-style URLs). AWS S3 uses the defaulthost.repo1-storage-verify-tls=ndisables TLS certificate verification. It’s set here only because the local MinIO container runs plain HTTP for the demo. For any real endpoint (which will be serving HTTPS), remove this line frompgbackrest.confentirely so pgBackRest validates the server’s certificate the way it should. The same applies to a self-hosted MinIO/Ceph: put a valid TLS cert in front of it and let pgBackRest verify.archive-async=ylets WAL archiving queue and push in the background so it keeps up with a busy database.repo1-cipher-typeandrepo1-cipher-passare optional; they enable client-side repository encryption and are off by default. When set, pgBackRest encrypts each file on the database host before it leaves for S3, so what lands in the bucket is already ciphertext, independent of any server-side encryption (SSE-S3, SSE-KMS, MinIO’s own at-rest encryption) the bucket may also do.aes-256-cbcis the only supported cipher. To skip encryption, remove both lines or setcipher-type=none. If you do enable it, the passphrase is never stored in the repository, so losing it makes the backups unrecoverable. Generate a long random value, keep it in a secrets manager, and make sure more than one person can reach it.
Pointing this at a different provider
| Provider | repo1-s3-endpoint | repo1-s3-uri-style | repo1-s3-region |
|---|---|---|---|
| AWS S3 | s3.us-east-1.amazonaws.com | omit (default host) | bucket’s real region |
| MinIO | minio.internal:9000 | path | any string |
| Ceph RGW | gateway host | path | as configured |
| Backblaze B2 | s3.us-west-004.backblazeb2.com | host | match endpoint |
| Cloudflare R2 | <account-id>.r2.cloudflarestorage.com | path | auto |
5. Wire Postgres to archive WAL
Add to postgresql.conf:
wal_level = replica
archive_mode = on
archive_command = 'pgbackrest --stanza=orders archive-push %p'
archive_timeout = 60
If archive_command fails, Postgres keeps the segment and retries. A temporary S3 outage won’t lose WAL; it just grows pg_wal until the archive catches up.
WARNING
A persistent archive failure (revoked S3 credentials, deleted bucket, hit a bucket quota, prolonged network partition, expired TLS cert) keeps growing pg_wal until it fills the database’s disk. Once that disk fills, Postgres stops accepting writes and eventually PANICs. This is one of the most common ways self-managed Postgres clusters break. Monitor the gap between the database’s current WAL position and the latest archived segment, and alarm well before it approaches your free-disk threshold (the “Operational practice” section at the end of the post comes back to this).
archive_mode needs a restart, not a reload:
sudo systemctl restart postgresql@16-main6. Initialise and take the first backup
sudo -u postgres pgbackrest --stanza=orders stanza-create
sudo -u postgres pgbackrest --stanza=orders check
sudo -u postgres pgbackrest --stanza=orders --type=full backup
check writes a test WAL segment and confirms it lands in the repository, proving the archive path end to end. Run it before you trust the setup. The first backup is always full regardless of --type.
Inspect the repository:
sudo -u postgres pgbackrest --stanza=orders infostanza: orders
status: ok
cipher: aes-256-cbc
db (current)
wal archive min/max (16): 000000010000000000000003/00000001000000000000000A
full backup: 20260522-090014F
timestamp start/stop: 2026-05-22 09:00:14 / 2026-05-22 09:01:47
wal start/stop: 000000010000000000000005 / 000000010000000000000005
database size: 1.1GB, database backup size: 1.1GB
repo1: backup set size: 122MB, backup size: 122MBwal archive min/max is the heart of PITR: the continuous WAL range the repository holds. You can recover to any moment inside it. A gap is a wall PITR can’t cross.
7. Schedule ongoing backups
The first backup above was a one-off; from now on we want them to run on their own. Drop a file into /etc/cron.d/ so the system cron runs the commands as the postgres user. The file format is the standard cron expression followed by a username and the command (this user field only exists in /etc/cron.d and /etc/crontab; if you use crontab -u postgres -e instead, omit it).
# /etc/cron.d/pgbackrest
0 2 * * 0    postgres  pgbackrest --stanza=orders --type=full backup
0 2 * * 1-6  postgres  pgbackrest --stanza=orders --type=incr backup
What this does:
- Sunday at 02:00: a
fullbackup. Every file in the data directory is copied to S3. - Monday through Saturday at 02:00: an
incr(incremental) backup. Only files changed since the last backup of any type are copied, which is tiny in comparison and finishes quickly.
pgBackRest also supports a third type, --type=diff (differential), which copies files changed since the last full backup. Differentials sit between full and incremental: larger than an incremental, smaller than a full, restore in fewer hops than a chain of incrementals. For most workloads the weekly-full + daily-incremental pattern above is plenty; reach for differentials if your incremental chain gets long enough that restores feel slow.
This cadence pairs with repo1-retention-full=2 from the config: at any given time you have two full backups (this Sunday’s and last Sunday’s) plus the incrementals chained off each, and pgBackRest auto-expires anything older. Want more history? Raise the retention number and size the bucket for the extra WAL.
Backup type affects restore speed, not restore range. The WAL archive defines how far back you can go.
Performing a point-in-time recovery
Scenario: at 14:30 someone runs a destructive statement. You want the database exactly as it was at 14:29:00.
1. Stop Postgres and pick a target
sudo systemctl stop postgresql@16-mainpgBackRest supports several target types:
| Target | --type | Meaning |
|---|---|---|
| Timestamp | time | Stop at the first commit after this time. Most common. |
| Transaction ID | xid | Stop right after a specific transaction. Surgical. |
| Named restore point | name | Stop at a label set with pg_create_restore_point(). |
| LSN | lsn | Stop at an exact WAL position. |
| Immediate | immediate | Stop as soon as the backup is consistent. No WAL replay. |
| Latest | (default) | Replay every available WAL segment. Disaster recovery. |
For accidental writes, time is usually right. Sources for the timestamp: application or audit logs, the Postgres log (log_statement or log_min_duration_statement), or the offending transaction’s XID.
Belt-and-braces habit: drop a named restore point before any risky operation. Postgres ships a built-in, pg_create_restore_point(name), that writes a labelled marker into the WAL stream at exactly the moment you call it. The marker carries the name you choose and travels with the WAL like any other record.
-- requires superuser, or a role with EXECUTE on the function
SELECT pg_create_restore_point('before_pricing_migration');
Call this from wherever runs the risky thing: the first statement of a migration script, a pre-deploy step in CI, or a psql session right before a hand-rolled UPDATE or DELETE. If you never need to recover, the marker just sits in WAL costing nothing. If you do, you restore with --type=name --target=before_pricing_migration and pgBackRest tells Postgres “stop replay at the record named before_pricing_migration”, removing the timestamp guesswork entirely. The recovered database is in exactly the state it was the moment before that SQL call ran.
NOTE
- The function runs only on the primary; standbys are read-only and can’t write WAL.
- Names aren’t unique. If you call it twice with the same label, recovery stops at the first match. Make the names distinct per operation, e.g.
before_pricing_migration_2026_05_22or include a build number.
2. Run the restore
sudo -u postgres pgbackrest --stanza=orders \
  --type=time \
  --target='2026-05-22 14:29:00' \
  --target-action=promote \
  --delta \
  restore
What the flags do:
--targetis the stop point;--type=timesays interpret it as a timestamp.--target-action=promoteopens the database for writes after recovery. Alternatives:pause(server stays in read-only recovery so you can inspect first) andshutdown.--deltacompares the existing data directory against the repository and copies only differing files. Dramatically faster on a large in-place restore. Omit for a fresh empty directory.
pgBackRest picks the most recent backup taken before the target, restores its files from S3, writes the recovery parameters into postgresql.auto.conf, and creates recovery.signal in the data directory. Don’t edit those by hand.
3. Start the server and let it recover
sudo systemctl start postgresql@16-main
sudo tail -f /var/log/postgresql/postgresql-16-main.log
Postgres sees recovery.signal, enters recovery, and replays WAL pulled from S3 by pgBackRest’s restore_command. You’re looking for:
LOG:  starting point-in-time recovery to 2026-05-22 14:29:00+00
LOG:  restored log file "00000001000000000000002B" from archive
LOG:  recovery stopping before commit of transaction 4815162, time 2026-05-22 14:29:03+00
LOG:  selected new timeline ID: 2
LOG:  archive recovery complete
LOG:  database system is ready to accept connections
The recovery stopping before commit line confirms Postgres stopped at the first transaction that committed after your target: every transaction up to and including 14:29:00 is present, nothing after it. new timeline ID: 2 is the fork.
4. Verify before pointing traffic at it
SELECT pg_is_in_recovery();           -- expect: false

-- spot checks: bad change absent, recent good data present
SELECT count(*) FROM orders WHERE created_at > '2026-05-22 14:00:00';
SELECT max(created_at) FROM orders;
TIP
With --target-action=pause, the server stays read-only here. Inspect, then SELECT pg_wal_replay_resume(); to commit. Useful when you’re unsure of the exact target.
5. Take a fresh full backup on the new timeline
The recovered cluster is on timeline 2, but your backup set is timeline 1. Reset the baseline:
sudo -u postgres pgbackrest --stanza=orders --type=full backupWARNING
Skip this and your newest recoverable state predates the incident.
When you guessed wrong
A timestamp is a guess, and first guesses are often off. Recovery is non-destructive to the WAL archive, so you get unlimited retries: stop the server and restore again with a different target. --delta keeps each retry fast.
This is the practical case for --target-action=pause during a real incident: inspect first, retry without ever exposing bad data to the application.
Operational practice
- Test restores monthly. A backup you’ve never restored is a hypothesis. Use
pgbackrest --stanza=orders verifyfor non-destructive checksum validation, but rehearse the actual restore too. - Alarm on WAL archive lag. If
archive_commandstarts failing, PITR coverage silently stops advancing whilepg_walfills the disk. Alert on the gap betweenwal archive maxand the live WAL position. - Different failure domains. An S3 endpoint on the database host protects against almost nothing. Managed S3 handles redundancy for you; self-hosted MinIO/Ceph need site or bucket replication. pgBackRest can also write to two repos at once; add a
repo2-*block on independent storage. - Protect the cipher passphrase. Not stored in the repo; lose it and the backups are dead. Secrets manager, more than one person can reach it.
- Match retention to RPO.
repo1-retention-full=2means PITR reaches back to the start of the older of two full backups. Need three weeks? Set retention and size the bucket for the WAL volume that implies.
Wrap-up
A base backup is a snapshot, the WAL archive is the log of everything since, recovery replays that log to wherever you want and stops. pgBackRest manages both halves over the S3 protocol, so any S3-compatible bucket works as the repo, managed or self-hosted.
Copying this config across projects is easy. Knowing it works in your setup, against your bucket, on your hardware, is not; that only comes from running a recovery for real once. Do a dry run into a scratch environment before you need a real one. The first time you perform a PITR shouldn’t be while production is down.
Appendix: try it locally with docker-compose
Everything above can be reproduced on a laptop without touching the host. The setup is four files: a docker-compose.yml, a small Dockerfile that adds pgBackRest to the official Postgres image, the pgbackrest.conf we built earlier, and a Postgres init script that turns on archiving.
.
├── docker-compose.yml
├── Dockerfile
├── pgbackrest.conf
└── init-archive.sh
NOTE
Modern pgBackRest (2.58 at the time of writing) always uses TLS for S3 endpoints. repo1-storage-verify-tls=n only disables certificate validation, not the TLS handshake itself. So this lab gives MinIO a self-signed cert (generated by a small certs init container) instead of running it on plain HTTP.
Dockerfile, a Postgres image with pgBackRest installed so archive_command can call it:
FROM postgres:16
RUN apt-get update \
 && apt-get install -y --no-install-recommends pgbackrest \
&& rm -rf /var/lib/apt/lists/*pgbackrest.conf, the same shape as the production file, retargeted at the in-network MinIO:
[global]
repo1-type=s3
repo1-s3-endpoint=minio:9000
repo1-s3-bucket=pgbackrest
repo1-s3-region=us-east-1
repo1-s3-key=pgbackrest
repo1-s3-key-secret=a-long-random-secret
repo1-path=/orders
repo1-s3-uri-style=path
repo1-storage-verify-tls=n
repo1-retention-full=2
process-max=2
log-level-console=info
start-fast=y

[global:archive-push]
archive-async=y

[orders]
pg1-path=/var/lib/postgresql/data
pg1-port=5432init-archive.sh, which runs once at first startup and enables WAL archiving:
#!/bin/bash
set -e
cat >> "$PGDATA/postgresql.conf" <<EOF
wal_level = replica
archive_mode = on
archive_command = 'pgbackrest --stanza=orders archive-push %p'
archive_timeout = 60
EOFdocker-compose.yml, wiring a cert generator, MinIO over TLS, a one-shot bucket-setup helper, and Postgres-with-pgBackRest:
services:
  certs:
    image: alpine:3.20
    volumes:
      - minio-certs:/certs
    entrypoint: ["/bin/sh", "-c"]
    command:
      - |
        apk add --no-cache openssl >/dev/null
        cd /certs
        if [ ! -f public.crt ]; then
          openssl req -new -x509 -nodes -days 365 \
            -subj "/CN=minio" \
            -addext "subjectAltName=DNS:minio,DNS:localhost,IP:127.0.0.1" \
            -keyout private.key -out public.crt
          chmod 644 public.crt private.key
        fi

  minio:
    image: quay.io/minio/minio
    depends_on:
      certs: { condition: service_completed_successfully }
    command: server /data --console-address ":9001"
    environment:
      MINIO_ROOT_USER: minioadmin
      MINIO_ROOT_PASSWORD: minioadmin123
    ports: ["9000:9000", "9001:9001"]
    volumes:
      - minio-data:/data
      - minio-certs:/root/.minio/certs:ro
    healthcheck:
      test:
        - "CMD-SHELL"
        - "mc alias set --insecure local https://localhost:9000 minioadmin minioadmin123 >/dev/null 2>&1 && mc ready --insecure local"
      interval: 5s
      retries: 10

  minio-setup:
    image: minio/mc
    depends_on:
      minio: { condition: service_healthy }
    entrypoint: ["/bin/sh", "-c"]
    command:
      - |
        mc alias set --insecure local https://minio:9000 minioadmin minioadmin123
        mc --insecure mb -p local/pgbackrest
        mc --insecure admin user add local pgbackrest a-long-random-secret
        mc --insecure admin policy attach local readwrite --user pgbackrest

  postgres:
    build: .
    depends_on:
      minio-setup: { condition: service_completed_successfully }
    environment:
      POSTGRES_PASSWORD: postgres
    ports: ["5432:5432"]
    volumes:
      - postgres-data:/var/lib/postgresql/data
      - ./pgbackrest.conf:/etc/pgbackrest/pgbackrest.conf:ro
      - ./init-archive.sh:/docker-entrypoint-initdb.d/10-archive.sh:ro

volumes:
  minio-data:
  minio-certs:
  postgres-data:
Bring it up:
docker compose up -d --buildPostgres restarts itself once after the init script runs so archive_mode takes effect. Wait a few seconds, then initialise the stanza and take a first backup. Note -u postgres on every docker compose exec: pgBackRest connects to Postgres as the OS user that invokes it, and only the postgres role exists in the container (running as root would fail with role "root" does not exist).
docker compose exec -u postgres postgres pgbackrest --stanza=orders stanza-create
docker compose exec -u postgres postgres pgbackrest --stanza=orders check
docker compose exec -u postgres postgres pgbackrest --stanza=orders --type=full backup
docker compose exec -u postgres postgres pgbackrest --stanza=orders info
To rehearse a PITR, write some data, capture a cutoff time, do a destructive change, then recover to the cutoff.
Write something:
docker compose exec -u postgres postgres psql -U postgres -c \
  "CREATE TABLE orders (id serial, created_at timestamptz default now());"
docker compose exec -u postgres postgres psql -U postgres -c \
  "INSERT INTO orders DEFAULT VALUES;"
Capture the cutoff timestamp:
TARGET=$(docker compose exec -T -u postgres postgres psql -U postgres -tAc "SELECT now();")
sleep 2
The “bad” change we want to undo:
docker compose exec -u postgres postgres psql -U postgres -c "DROP TABLE orders;"Restore back to $TARGET:
docker compose stop postgres
docker compose run --rm -u postgres postgres pgbackrest --stanza=orders \
  --type=time --target="$TARGET" --target-action=promote --delta restore
docker compose start postgres
Verify the dropped table is back:
docker compose exec -u postgres postgres psql -U postgres -c "SELECT count(*) FROM orders;"The MinIO console is at https://localhost:9001 (login minioadmin / minioadmin123) if you want to see the backup files land in the bucket. Your browser will warn about the self-signed certificate; click through.
When you’re done:
docker compose down -vThis stack is purely for experimenting. The real production version is everything above the appendix: pgBackRest installed on the host, the postgres OS user, systemd, locked-down /etc/pgbackrest/pgbackrest.conf, an S3-compatible bucket living in a different failure domain from the database.
One pattern this appendix deliberately skips is running pgBackRest as a separate sidecar container that talks to Postgres over its TLS server mode (pg1-host, pg1-host-type=tls, mTLS certs on both sides). That’s the right model for serious container deployments, and it’s what Kubernetes operators like CloudNativePG, the Zalando Postgres Operator, and Crunchy PGO implement under the hood. Hand-rolling it in a compose file adds enough config (cert generation, host topology, pgBackRest server mode wired on both sides) that you mostly end up teaching yourself Docker plumbing rather than pgBackRest. If you want the sidecar architecture in anger, use one of those operators rather than building it from scratch.